In today’s digital age, it is important to protect your brand and content on social media. One effective way to achieve this is by adding watermarks to your social media images.
Why Add Watermarks? #
Adding watermarks to your social media images offers several benefits:
- Brand Protection: It safeguards your content from being used without attribution.
- Increased Brand Awareness: A watermark acts as a constant reminder of your brand, enhancing visibility.
- Copyright Protection: It signifies ownership of the content.
- Consistent Brand Recognition: Helps in establishing a uniform brand identity across various platforms.
Adding Watermarks #
Creating a Watermark #
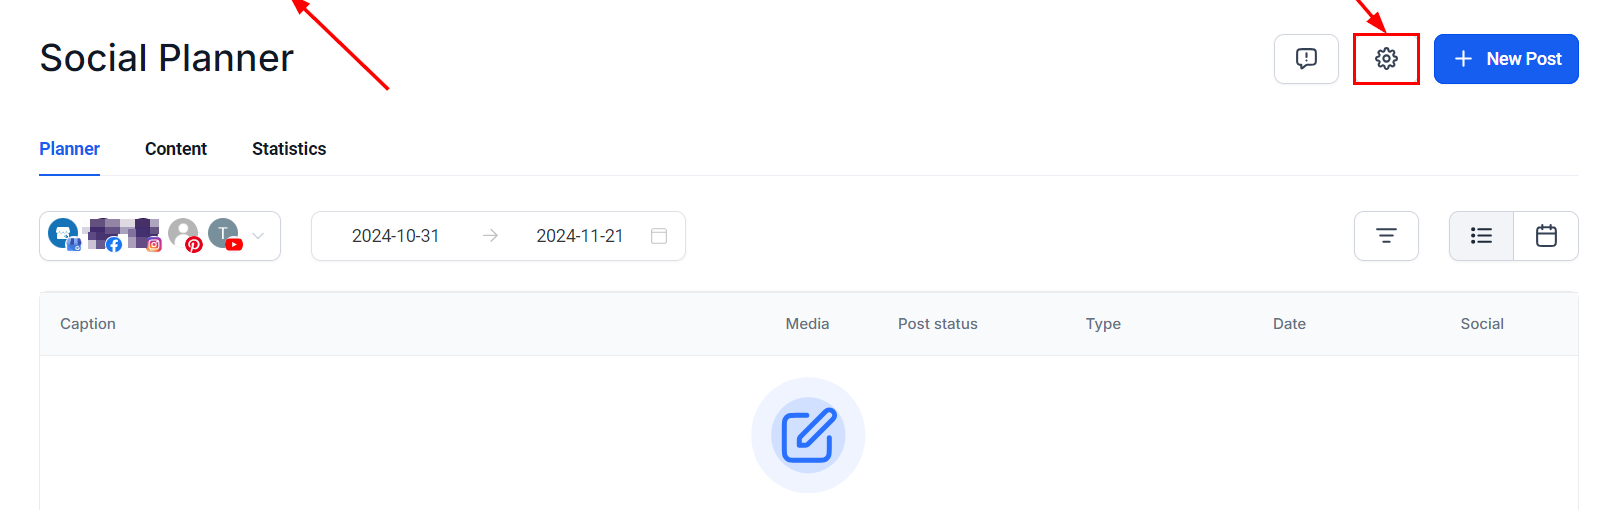
Navigate to the social media planner by selecting ‘Marketing’ on the left sidebar, then ‘Social Media Planner’ at the top. Click on the settings icon located on the right to find the watermark section.
Click on “Watermark”, then “+ Add Watermark”.

Watermark Name #
Name your watermark to easily identify it.

Upload #
Upload the image you want to use as your watermark. For the best results, ensure the image is 200×200 pixels. Once you have uploaded your image, preview it in the section above.

Alignment #
Choose the watermark’s alignment (left, right, center, top, or bottom) and adjust its position as desired.

Opacity #
Adjust the opacity to make the watermark more or less visible according to your preference.

Scale #
Scale the size of your watermark to fit your images perfectly.

Auto Padding #
Enable or disable the auto-padding feature, which controls the space between the watermark and the edges of the image. Auto-padding helps maintain a balanced appearance by preventing the watermark from being too close to the edges.

When you have completed your customizations, click “Create” to save your new watermark!
Frequently Asked Questions #
Q: My watermark isn’t showing on the post. What could be wrong?
- Ensure the watermark feature is toggled on in the ‘Advanced Options’ of your post. Also, check if the watermark’s opacity and scale are set correctly.
Q: Can I use different watermarks for different posts?
- Currently, the CRM supports one watermark at a time. You can change your watermark in the settings, but it will be applied to all future posts until changed again.
✍️ Important Notes✍️ #
- The watermark feature is currently available for images only, not videos.
- The watermark will be applied to all social media accounts linked to the CRM.
What's your Reaction?
You have reacted on"How to Add a Watermark to an Image in the Socia..."
A few seconds ago


 Subscriptions
 My Orders
 My Wishlist
 Refer & Earn💸
 My Projects
 Conversations
 Website Services
 New Website Request
 Website Addons
 Graphic Design
 Video Production
 Marketing Services
 Get a Marketing Plan
 Local SEO Audit

 Latest Updates
 Consultation Calls
 Tools & Extensions


