ActiveProspect’s consent tracking is a feature designed to help businesses manage and document consumer consent for marketing and data collection. It ensures that companies can capture and store proof of consent for each lead, which is critical for compliance with regulations like GDPR and CCPA. Read on to learn how to implement ActiveProspect Consent Tracking on your forms.
Begin by accessing the desired form or creating it in the Data Collect section of your account. Construct your form as you normally would by adding the necessary fields that you want your customers to fill out.
Add Custom Field #
Create a custom short text field named ‘xxTrustedFormCertUrl’.

Drag this field into your form above the submit button.

Save Your Form #
Once you’ve placed the custom field correctly, save your form.

Integrating Active Prospect Script #
Access Form Integration Options #
Click on the Integrate button, select the Link tab, and open your form in a new tab.

It’s recommended to use the Chrome browser for this step.

Insert the Custom Script #
Copy the custom script provided below.
<script type=”text/javascript”> (function() { var field = ‘xxTrustedFormCertUrl’; var provideReferrer = false; var invertFieldSensitivity = false; var tf = document.createElement(‘script’); tf.type = ‘text/javascript’; tf.async = true; tf.src = ‘http’ + (‘https:’ == document.location.protocol ? ‘s’ : ”) + ‘://api.trustedform.com/trustedform.js?provide_referrer=’ + escape(provideReferrer) + ‘&field=’ + escape(field) + ‘&l=’+new Date().getTime()+Math.random() + ‘&invert_field_sensitivity=’ + invertFieldSensitivity; var s = document.getElementsByTagName(‘script’)[0]; s.parentNode.insertBefore(tf, s); } )();function trustedFormCertUrlCallback(certificateUrl) { document.getElementsByName(‘FORMID’)[0].value = certificateUrl; document.getElementsByName(‘FORMID’)[0].dispatchEvent(new Event(“input”));}</script><noscript> <img src=”http://api.trustedform.com/ns.gif” /></noscript>
Return to your form builder in the CRM, navigate to the Quick Add tab, and drag an HTML field below your submission button.
Click on the HTML field, select Edit Script, and paste the copied script.

Update the Form ID in the Script: #
In the Chrome browser tab where your form is open, right-click and select Inspect.
Use the mouse pointer option to hover over the custom field you added above the submit button and click to reveal the form field name.
Copy the string of letters and numbers that represent the form field name.

Return to your form builder and replace the placeholder form ID in the script with the string you copied.


Save Your Changes #
After updating the script with your form’s specific ID, save your changes.

Hiding the Consent Tracking Field #
Apply Custom CSS #
Copy the custom CSS code provided below:.menu-field-wrap:nth-child(4) {display: none;}
In your form builder, go to the Styles tab and paste the copied CSS code into the custom CSS box.
Adjust the position number in the CSS code to match the position of your consent tracking field in the form. For example, if it’s the fifth field, change the number accordingly.

Save and Test Your Form #
Save your changes and refresh the form page.
Submit a test entry to ensure everything is working correctly.

Verifying Consent Tracking #
Check Submission for Consent Certificate: #
Navigate to Data Collect, then Forms, and select Submissions.
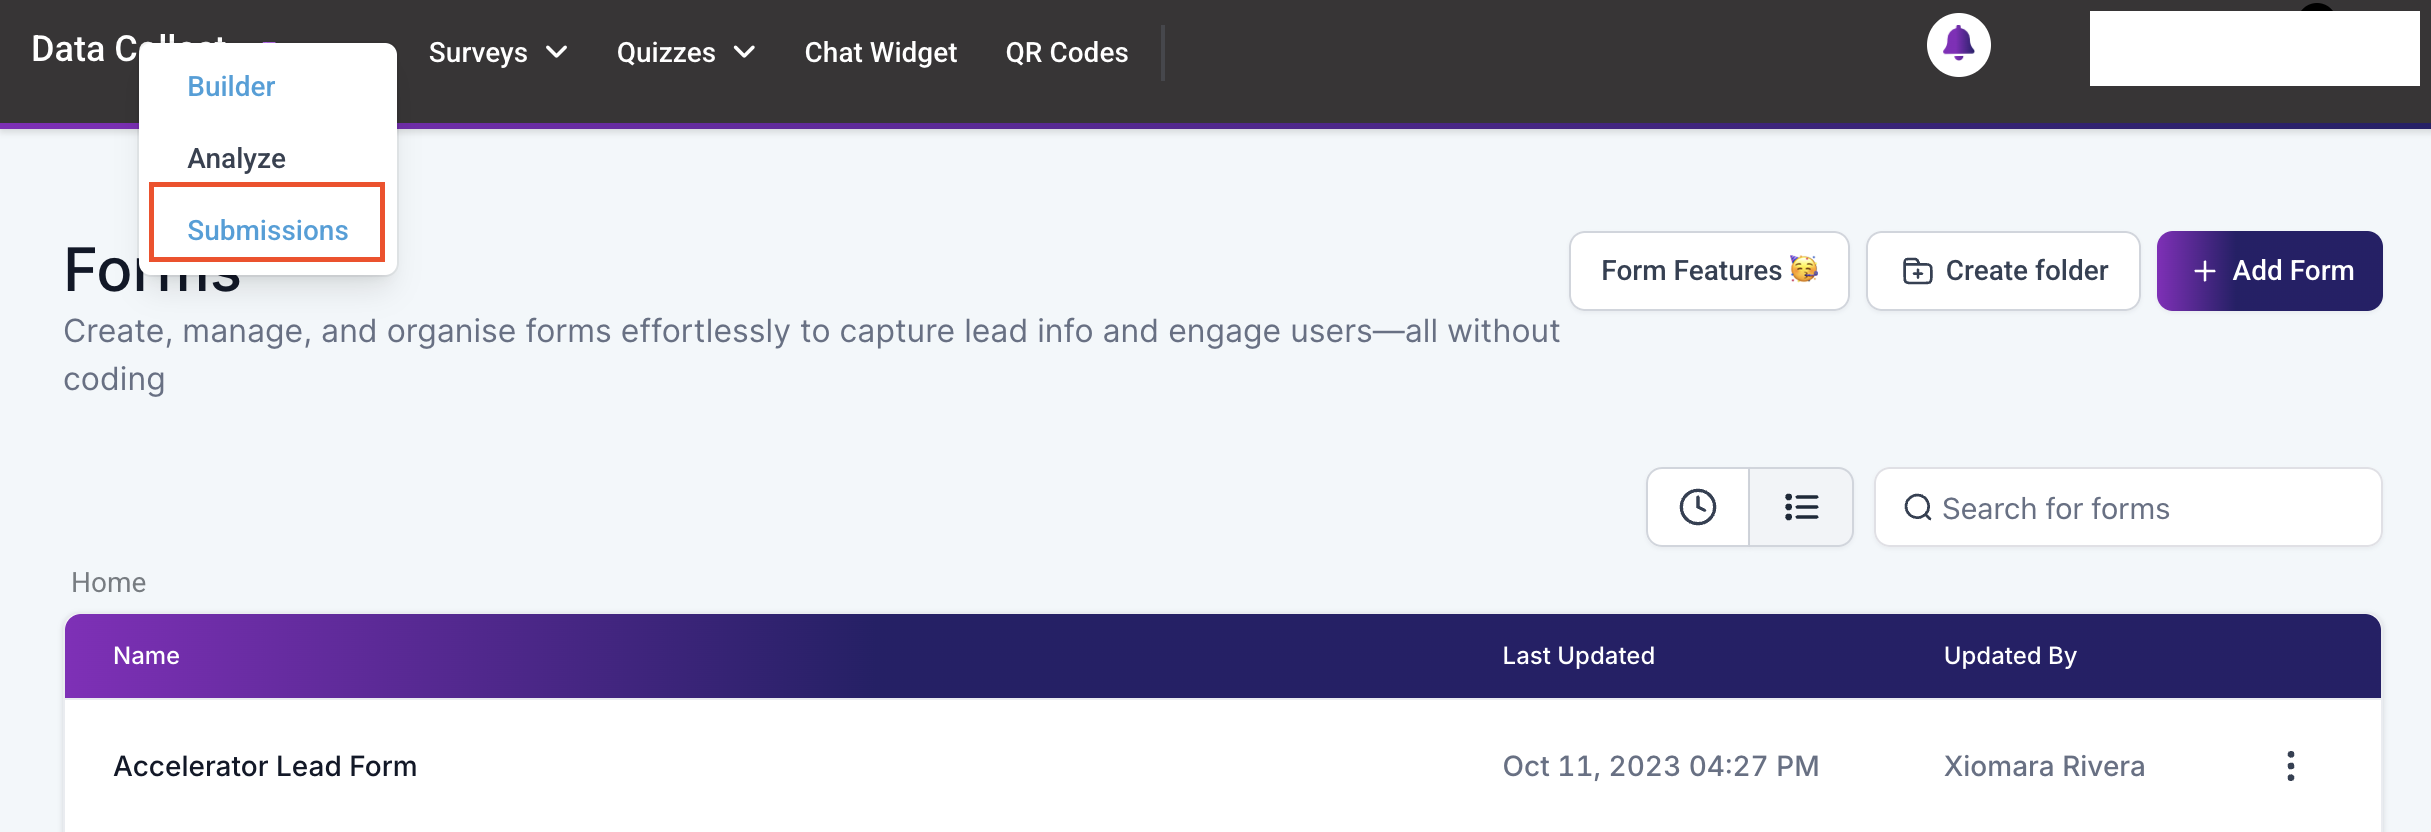
Open your test submission. You should see a URL to the ActiveProspect consent certificate in the submission details.

If you’re a paying customer of ActiveProspect, you can claim the certificate by opening the provided URL.
This feature tracks when and how consent was obtained (e.g., through web forms, calls, or other interactions) and maintains a detailed record of that consent. This enables businesses to demonstrate that they have received proper consent to contact leads or use their data, reducing the risk of non-compliance with data protection laws.
Frequently Asked Questions #
Q: What if the consent tracking field doesn’t hide?
- Ensure you’ve correctly adjusted the position number in the custom CSS code to match the field’s position in your form.
Q: How do I find the form ID?
- Use the Chrome browser’s Inspect tool to hover over the consent tracking field and identify the form field name, which serves as the ID.
What's your Reaction?
You have reacted on"How to Implement ActiveProspect Consent Trackin..."
A few seconds ago


 Subscriptions
 My Orders
 My Wishlist
 Refer & Earn💸
 My Projects
 Conversations
 Website Services
 New Website Request
 Website Addons
 Graphic Design
 Video Production
 Marketing Services
 Get a Marketing Plan
 Local SEO Audit

 Latest Updates
 Consultation Calls
 Tools & Extensions


