

 Subscriptions
 My Orders
 My Wishlist
 Refer & Earn💸
 My Projects
 Conversations
 Website Services
 New Website Request
 Website Addons
 Graphic Design
 Video Production
 Marketing Services
 Get a Marketing Plan
 Local SEO Audit

 Latest Updates
 Consultation Calls
 Tools & Extensions
10
Jun
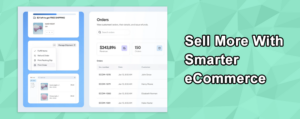
Smarter eCommerce Product Management at Scale📦
Manage Turnkey eCommerce™products at scale with less friction, more features and more speed.
June 10, 2026
June 10, 2026

June 10, 2026
June 3, 2026
May 26, 2026
May 20, 2026
WhatsApp messaging allows real-time communication with your customers, similar to Facebook Messenger you gain high feedback and visibility with the added low response time, and interactive messaging of SMS. To start using this Tool, head over to your Settings section.
Before diving into the integration process, ensure you have the following:
Navigate to the WhatsApp integration tab inside the CRM Settings. You will find a window for you to start your WhatsApp subscription, once you’ve filled it out you can get started with the setup.

Once you complete the subscription you’ll be prompted to sign in with your Facebook account.

Connect your Facebook account as normal by logging in to your account and allowing the permissions.

You can select a business from your portfolio or manually enter your business information to connect it with your phone number, this information will not be visible to your contacts.

Create or select a WhatsApp business Profile, this will be what customers see when interacting with your account.

If you have not created a WhatsApp Business account you can do so here, the steps to follow will be.

After filling in the information click next, add the phone number you’ll be using for your WhatsApp then select a verification method. Once the phone is verified your WhatsApp profile will be connected.

If you have already created and connected a WhatsApp business profile to your Facebook profile you can connect it with the CRM by selecting it, if you have 2FA enabled you will need to enter the confirmation code before continuing.

Once the profile has been created/selected click save to accept the permissions then click finish to set the connection.

After finishing the Facebook log-in you’ll be prompted to add a phone number in the system, once selected you will no longer be able to access it from the Whatsapp mobile app.

Select the verification method for the number. If using an existing phone number, enable call forwarding to receive the verification code from Meta, or if selecting SMS the verification code will appear under the Conversations tab.

Once the phone number is verified it will be connected to the CRM for you to start managing your WhatsApp conversations and business profile. This extra conversation channel allows you to better connect with your clients. Check the articles “WhatsApp Business Profile Management” and “Conversations & WhatsApp” to learn more about WhatsApp communications!