The easiest way to reward customers once they complete a desired action is a “Thank You” page. This step is typically shown once a visitor becomes a lead, for example after filling out a form or buying a product. And, while they are optional, they help you relay to the customer they’ve completed the path and can leave your site. Let’s see how to implement them!
Creating the Thank You Page #
Let’s begin by establishing the foundation of our set-up – the Thank You page. To do so, click “Add New Step” to create a new page within your funnel.

Name this new step “Thank You” and select “Create Funnel Step”.

Edit the Thank You page by adding a simple message. For instance, add a headline element that says “Thank You”.

Once satisfied save your changes.

With the Thank You page set up, we can now proceed to configure the redirection based on the lead’s actions.
Setting Up Redirection Scenarios #
There are two primary scenarios to consider for redirection:
Direct Purchase and Redirection #
This scenario applies when a lead clicks a button to make a purchase and is immediately redirected to the Thank You page. To set this up, select the button element and in the button actions, choose “One Click Up Downsell Product”.

Select the appropriate product, select Select a step as the “Sale Actions” then select the “Thank You” page as the funnel step and save. This ensures that upon clicking, the lead purchases the product and is redirected to the Thank You page.

Booking a Consultation #
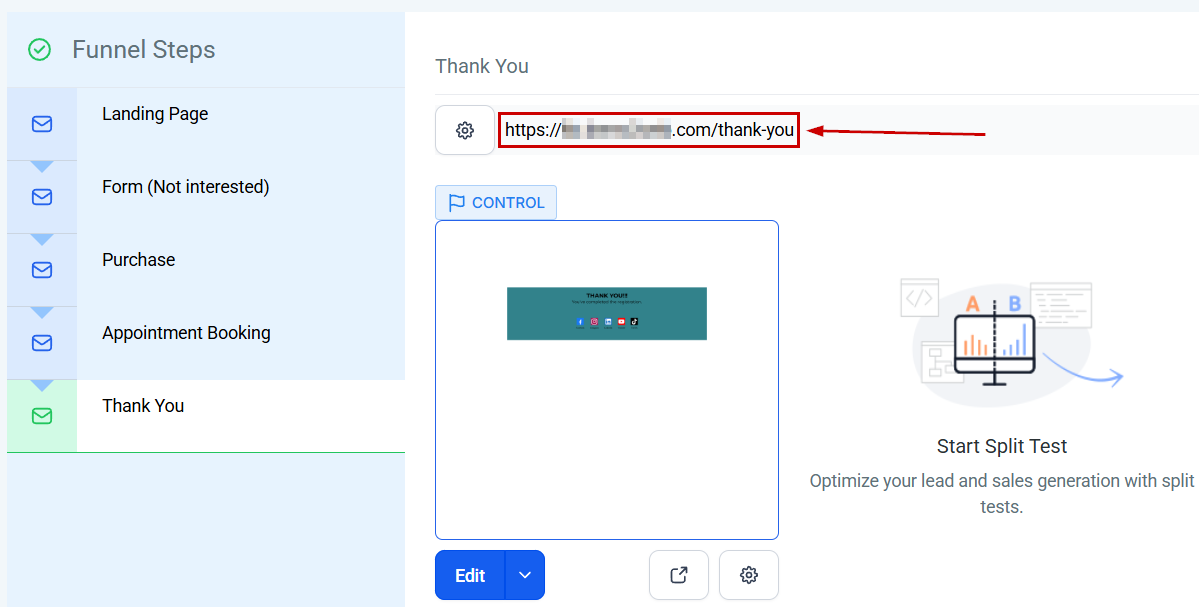
In this scenario, the lead clicks to book a consultation, chooses a time, and upon confirmation, is redirected to the Thank You page. To achieve this, copy the URL of the Thank You page.
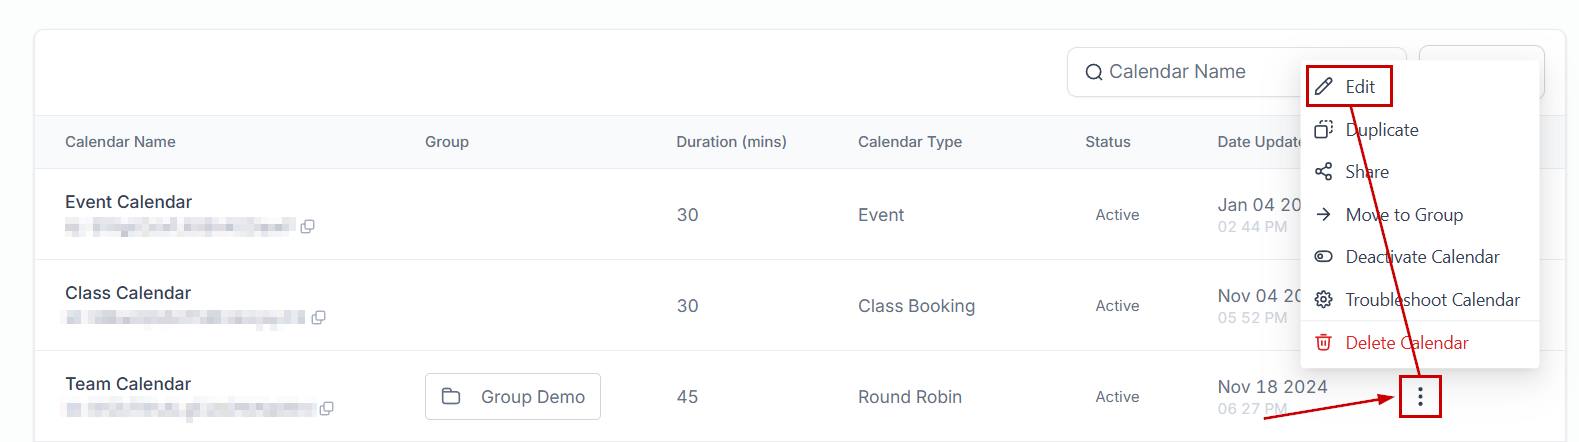
Then, navigate to the Calendars Settings tab inside the Calendars section.

Select your consultation calendar, and edit it.
Navigate to the Forms & Payment tab and select Redirect URL under Confirmation page.

Paste the Thank You page URL in the “Enter URL” field and save.

Troubleshooting Tips and FAQs #
What if the URL for the Thank You page doesn’t appear? #
- Ensure you have set up a domain for your funnel. Navigate to Settings and select a domain. If you haven’t added a domain, you’ll need to do so.
Can I customize the Thank You page further? #
- Absolutely. The CRM allows for extensive customization. Feel free to add more elements or personalized messages to enhance the user experience.
What should I do if the redirection isn’t working as expected? #
- Double-check the URLs and ensure that the correct actions are selected for each button. If issues persist, reviewing the funnel settings or reaching out for support may be necessary.
What's your Reaction?
You have reacted on"How to Redirect Leads to a Thank You Page"
A few seconds ago


 Subscriptions
 My Orders
 My Wishlist
 Refer & Earn💸
 My Projects
 Conversations
 Website Services
 New Website Request
 Website Addons
 Graphic Design
 Video Production
 Marketing Services
 Get a Marketing Plan
 Local SEO Audit

 Latest Updates
 Consultation Calls
 Tools & Extensions


